Google Maps Tips and Tricks only Power Users know!
May 01, 2018 12577 Shreya
Get Google Maps and literally carry information about every possible geographic place on the face of Earth! Discover tricks & tips to make the best use of Google Maps on your Android device and PC browser. Not all wanderers are lost, but not every wander can make the best use of maps and navigation, if you know what we mean.
A web mapping service developed by the technology giant Google is a name everyone is familiar with. But are you familiar with all the amazing tricks and tips you can use to make the experience even better? Let us tell you how to get the juice which is worth the squeeze!
Some of these tricks might be something you learn within 2 minutes and remember it for the rest of your life!
Google Maps give you information about real-time traffic, satellite images, street maps, street views and the route planning and navigation feature of-course! Keep reading to find out what else you can do with the help of Google Maps.1. Never forget your vehicle parking location again.
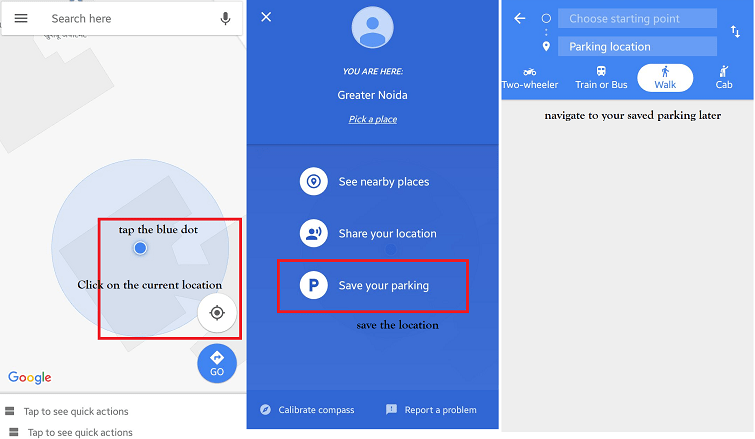
Do you tend to forget where you parked your car? Was it near the tall tree or somewhere near the local street vendors? (We do, however, recommend you park your vehicles in spaces made for parking.)Follow these steps the next time to save the trouble.
With the current location button, get to your current location (where you parked your car). Hit the blue dot and a new screen will open.
From here choose to save your parking.
Open navigation as you normally do and select the destination as your saved parking. Easy right?
2. Book commercial cabs directly from the map.
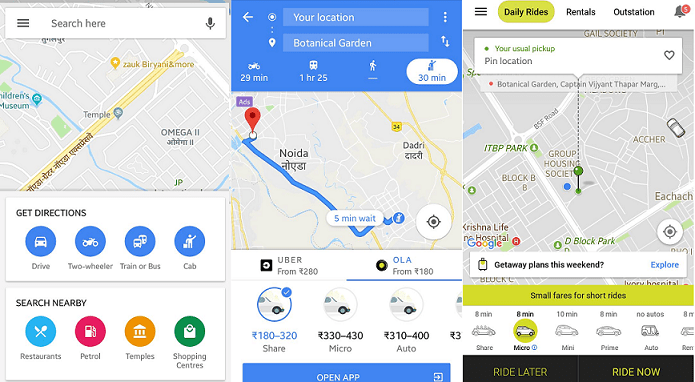
You don't need to open the same location again into your Uber or Ola to book a ride. It is frustrating we understand to repeat the same task over and over again. This is why we are grateful for this new feature that allows users to book commercial rides directly from within the application.
Browse the location as you normally would on the map. (Alternatively, select cabs from the home screen and skip to step number 5).
Expand location details by clicking on the name of the location.
Select get directions. You will find various commute details, such as walking, driving, shuttles and cab booking.
Select the cab service and continue to book a ride. ( Also, check out Ola Application - Services other than just Booking Rides! You won't be disappointed, we promise. It works even if no Ola cabs are available in your city!)
3. Single-handed zoom. (no screen-pinch required)
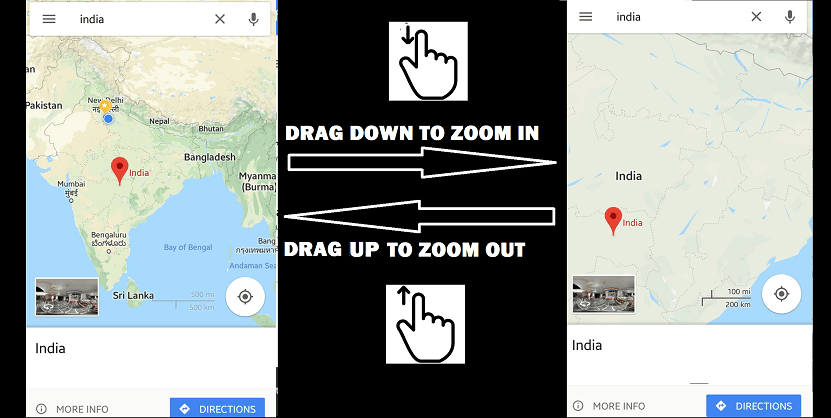
Midst driving, you might need to zoom into or out of the area on the screen. It requires the use of 2 hands( to hold the device while being behind the wheel and another hand to zoom). Any sane driver knows the potential dangers that come with it. To avoid it, use this simple trick, and just use 1 finger.
Double tap and without releasing the finger from the screen, drag the screen downwards to zoom in.
Do the same, double tap and without releasing the finger, drag the screen upwards to zoom out.
4. 3D view navigation.
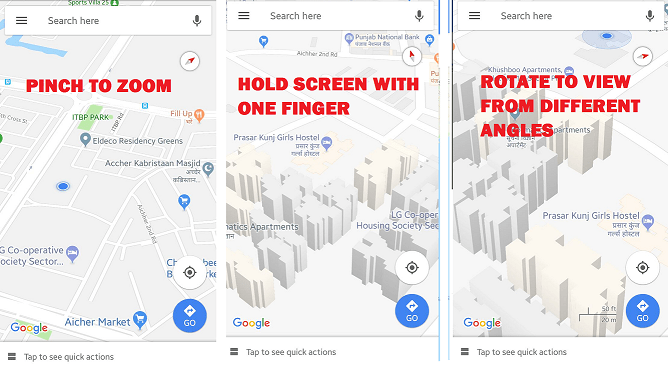
Ditch the traditional viewing of a flat 2D map. View 3D imagery of the location as you browse the map.
Simply zoom as you normally would for the area whose 3D view you need to see.
Tap-hold the screen with one finger and rotate the screen using another finger to view the 3D imagery.
Add this fun way of exploration, who knows what you might discover!
5. Improved public transportation (Metro/bus commute details included)
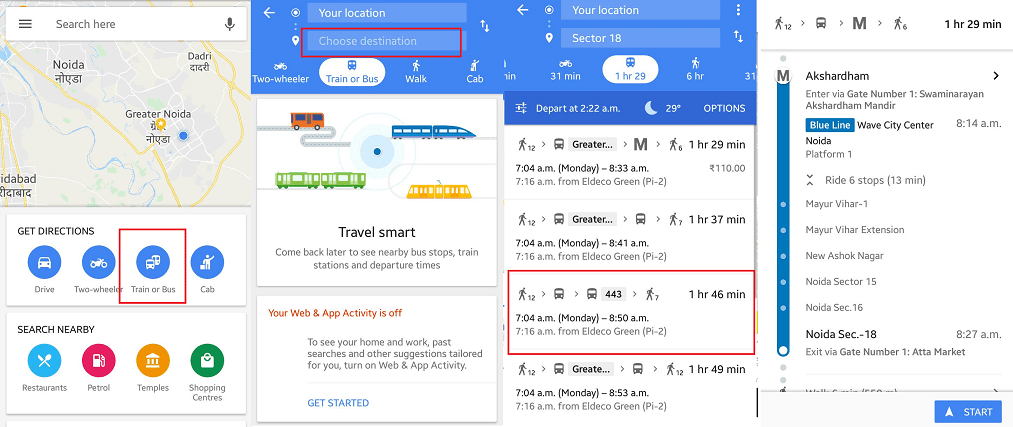
So you have planned your itinerary with which bus to board, which lane to shift to get on board with a metro coach. Do you know that you can also plan your itinerary with metro station details while browsing your route?
Select trains/ bus from the main menu.
Enter the destination to get started.
Browse the path best suited for you.
Tap to view the detailed itinerary. You can view that the metro boarding and deboarding details are mentioned as well. Metro platform details are described along with it too! Technology is making advancements, get with it. Amazing right?
6. Label and personalise saved places.
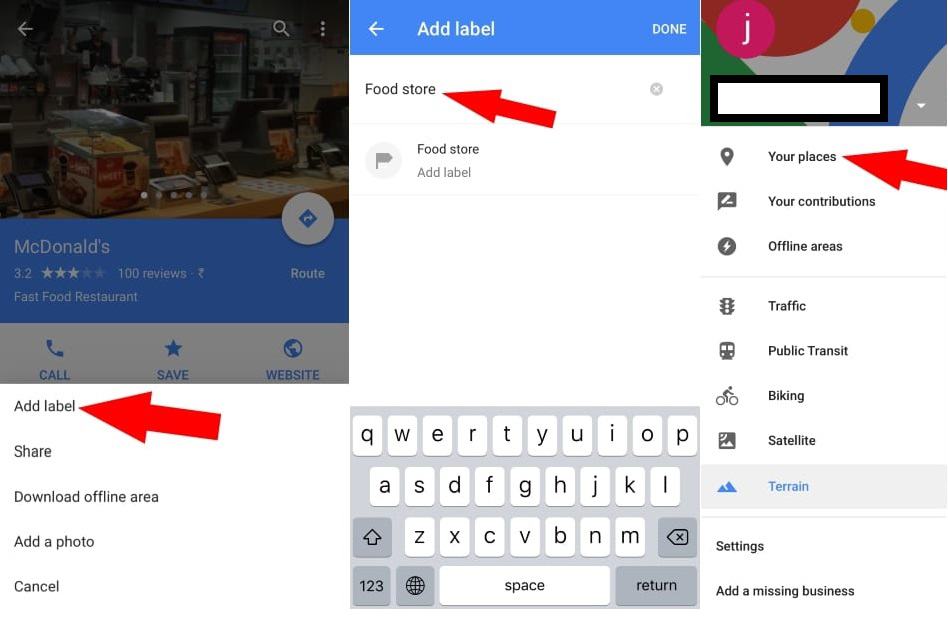
You can save places you want to visit in future. You can also categorise these saved places by types such as restaurants, or your friend's addresses, etc whichever means personalisation to you. Create private labels easy with the help of following steps:
Expand location details and save it in "your places".
On the bottom, tap on the "add label" option, and add the label you like.
You can access the labels later by going to your places from the main menu.
7. Time travel
Somewhat possible to view how a particular location changed over time. This makes use of the Google street buddy icon. If active on the selected location, you can view the history of the locality through its pictures. Go back in time to see how nature evolved.
Note: This works only if the area selected has been mapped multiple times! As of now, you can use this feature from your browser only.
Select the location
Drop the buddy on the available viewpoints.
Select the time icon from the top-left corner to view the timeline of images.
8. Create custom maps.
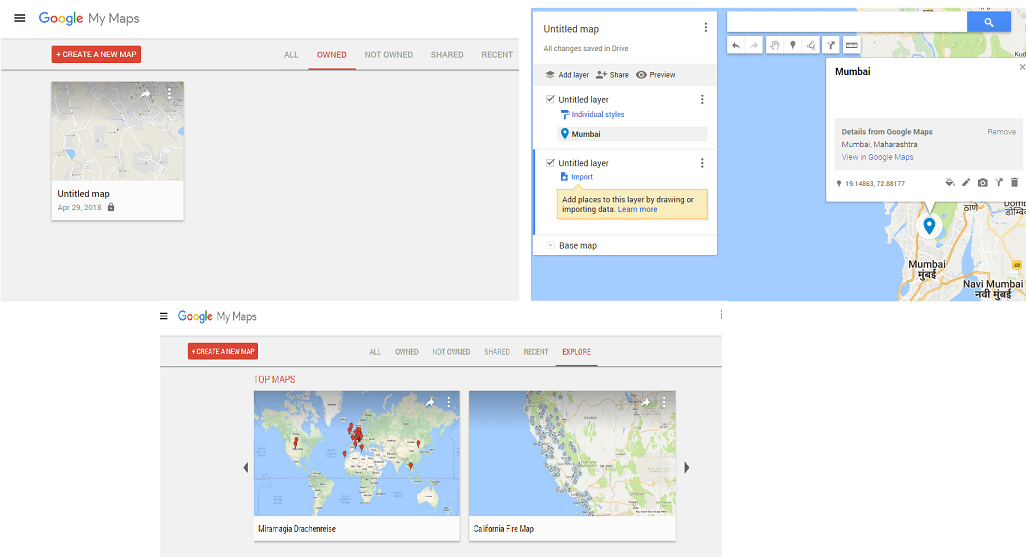
As unreal as it sounds, it's real. You can add locations to your map boundary, and places you'd like to visit. Add border points and save this personalised map for your use later. You can also view maps shared by others. Popular maps also carry information about cities of historic significance such as of World War I.
Note: This feature is currently accessible only from a PC browser.
Click on create a new map.
Select layers you wish to include, add more locations, more borders as many as you like.
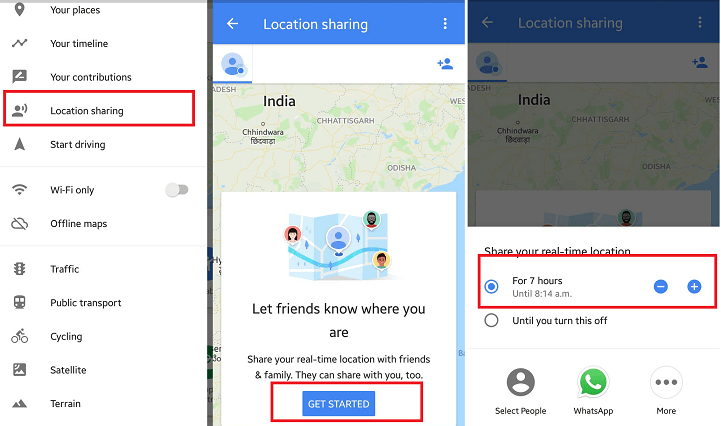
9. Share your location.
You can share your live location with the ones who care about you. This feature could lift up your security as your location can be observed for the duration you set (maximum up to 8 hours) with the ones you share it with. This is also handy when you need to tell your friends your estimated time of arrival in real-time.
Select location sharing from the menu tab.
Click on get started.
Select for how many hours would you like your location to be shared.
Select the means of alerting the recipient of your location updates. (Tap on more, if your desired application medium isn't displayed on the priority panel).
10. Save the map. (view without internet too)
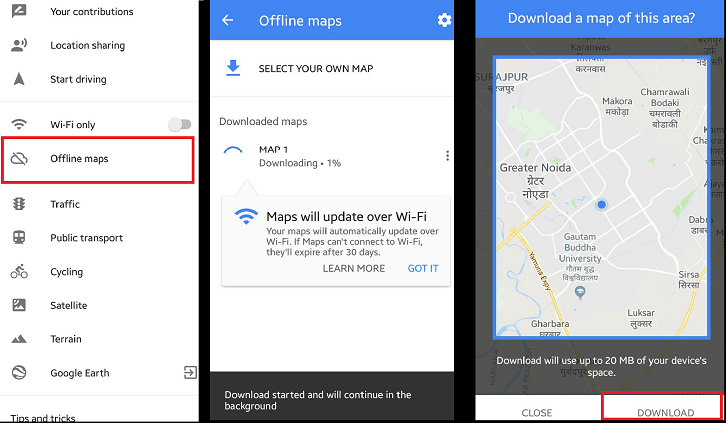
Yes, we are serious about this. If you didn't know already, you can save the map to view later. You can view the saved maps when offline i.e, without internet.
Click on offline maps from the menu on the left side.
Tap on select your own map.
Select the area from the frame whose map you desire to download. Hit download.
The maps will be available under offline maps whenever you wish to view it. However, the maps will be refreshed and re-loaded every 20 days so the information is up-to-date. (this will require a working internet connection for a refresh.)
Do share with us in the comments, which tricks were new to you. Feel free to tell us what other life hacks would you like us to include for you!
Was this article helpful?
Great!
Thanks for letting us know.
We’re sorry.
Please let us know what would make this better.
This is not the information that I was looking for
Solution did not work
Too long
Other
Got it.
Thanks for letting us know.
Opps
Something went wrong. Please try again.
